1 <Page.Resources >
2         <Style TargetType="Button">
3             <Setter Property="BorderBrush" Value="Lime"/>
4             <Setter Property="BorderThickness" Value="4"/>
5         </Style>
6     </Page.Resources>
2.显式方法,通过指定 Style 的 TargetType 和 x:Key 特性这一特性,然后通过使用显式键的 {StaticResource} 标记扩展引用设置目标控件的 Style 属性
<Page.Resources >
        <Style x:Key="btnStyle" TargetType="Button">
            <Setter Property="BorderBrush" Value="Lime"/>
            <Setter Property="BorderThickness" Value="4"/>
        </Style>
 </Page.Resources>

//调用
<Button Content="跳转方法" x:Name="btnTest" Style="{StaticResource btnStyle}"/>3.单个样式表示
//1.App.xaml配置文件中
<Application.Resources>
     <SolidColorBrush x:Key="BlueBrush" Color="#FF1C90D1"/>
</Application.Resources>

//2.页面中绑定值MainPage.xaml
<Rectangle Height="2" Width="18" Fill="{StaticResource EggshellBrush}"/>

//3.获取值MainPage.xaml.cs
App.Current.Resources["EggshellBrush"] as SolidColorBrush4.使用样式文件进行调整样式
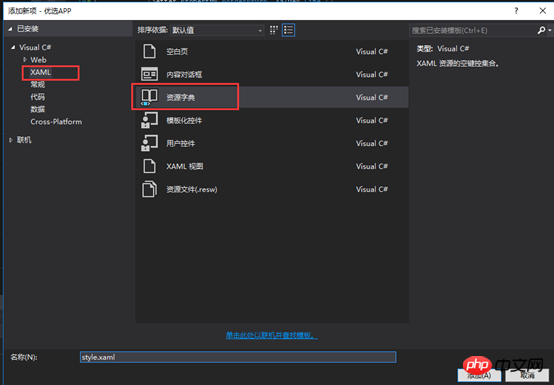
1) 创建文件夹Themes右键添加新建项visual C# àxamlà资源字典 style.xaml
2) 在style.xaml写样式例如
<Style TargetType="Button" x:Key="gft_FormBtm">
        <Setter Property="Background" Value="OrangeRed"></Setter>
        <Setter Property="Height" Value="50"></Setter>
        <Setter Property="FontSize" Value="16"></Setter>
        <Setter Property="Foreground" Value="White"></Setter>
        <Setter Property="HorizontalAlignment" Value="Center"></Setter>
        <Setter Property="MinWidth" Value="300"></Setter>
 </Style>
3) 在App.xaml文件中指定资源
<!--4.使用样式文件-->
    <Application.Resources>
        <ResourceDictionary>
            <ResourceDictionary.MergedDictionaries>
                <ResourceDictionary Source="Themes/style.xaml"></ResourceDictionary>
            </ResourceDictionary.MergedDictionaries>
        </ResourceDictionary>
</Application.Resources>
4) 在xaml界面中使用样式文件
1 <Button x:Name="btnSubmit" Content="同意以上协议并注册" HorizontalAlignment="Center" Click="btnSubmit_Click" Style="{StaticResource gft_FormBtm}" />以上就是UWP中设置控件样式四种方法 的详细内容,更多请关注php中文网其它相关文章!
声明:本文内容由网友自发贡献,版权归原作者所有,本站不承担相应法律责任。如您发现有涉嫌抄袭侵权的内容,请联系admin@php.cn核实处理。
程序员必备接口测试调试工具:点击使用
Apipost = Postman + Swagger + Mock + Jmeter
Api设计、调试、文档、自动化测试工具
网页生成APP,用做网站的技术去做APP:立即创建
手机网站开发APP、自助封装APP、200+原生模块、2000+映射JS接口按需打包
相关文章
相关视频